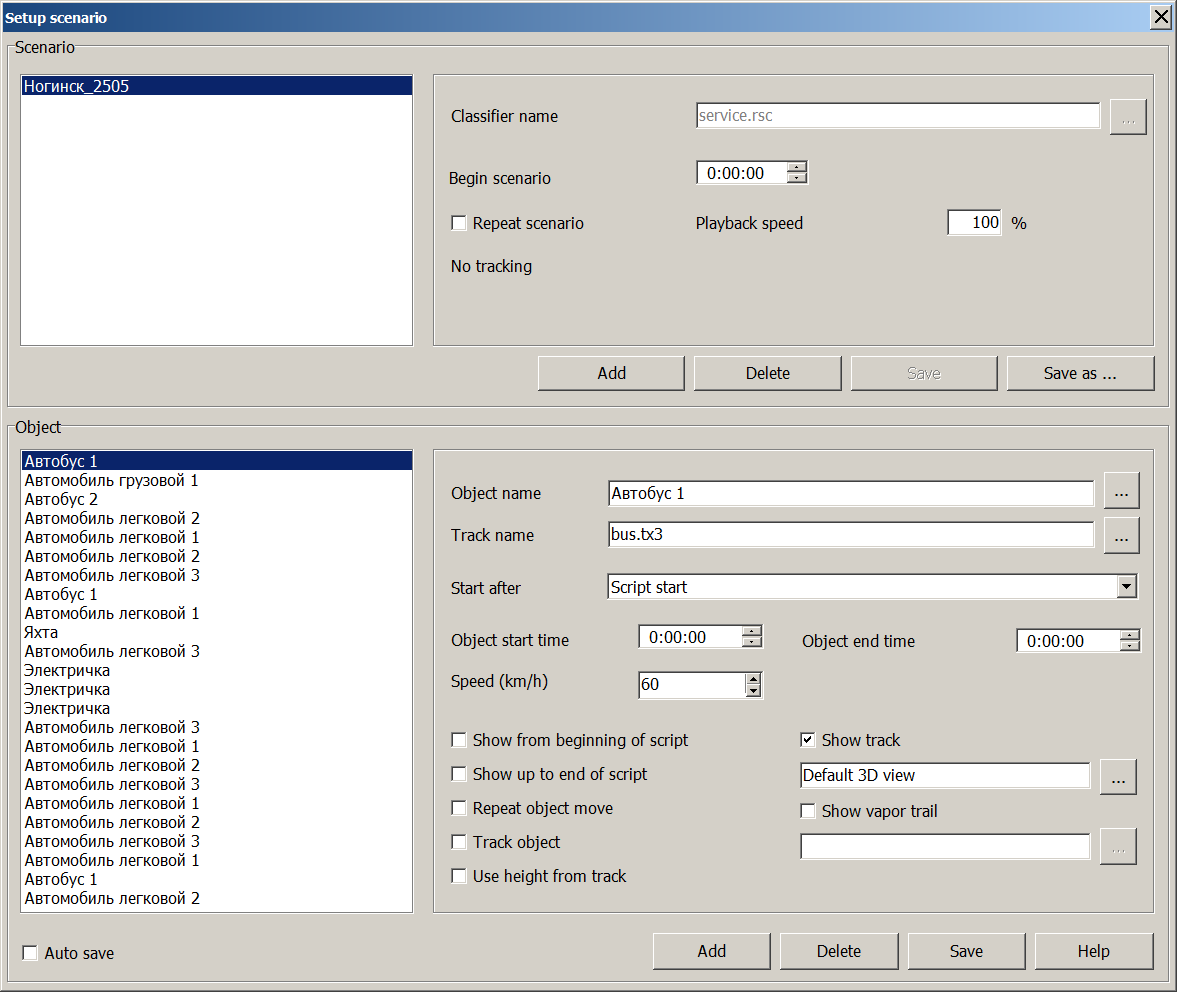
Setup of scenario |


|
|
This dialog is intended for creation and adjustment of scenarios of the moving objects. Scenario of the moving objects represents a set of the objects having the following characteristics: - object name; - three-dimensional view of object; - movement schedule (time of start and end of movement, speed); - Additional options.
Each scenario is formed on the basis of objects of one classifier containing three-dimensional views of objects. The default classifier service.rsc. The finished scenario is written into a new one selected when opening or into the already existing file. Several scenarios can be stored in one file, which are then selected for editing and playback.
Procedure for addition of new scenario: 1. In Scenario group click on the Add button. 2. In the Classifier name line, select a classifier containing three-dimensional views of objects. If the classifier and its p3d library are selected in a directory other than the scenario file directory, they will be copied to the scenario directory. 3. Set the start time of the scenario (relative, from the start of the scenario playback) in hours:minutes:seconds. 4. If necessary, change the name of the scenario by double-clicking on the scenario name, edit the name, press the Enter. 5. Click on the Save button. If the option is chosen Repeat scenario, then scenario performance will be cycled. If you need in deleting scenario it is necessary to choose the scenario in the list and consistently to press buttons Delete and Save. To change the playback speed of the scenario, you need to change the percentages of the Playback speed in the appropriate number of times, more than 100 - the speed will increase, less than 100 - the speed will decrease.
Procedure for addition of new object into the scenario: 1. In the Object group, click the Add button. The «New Object» is added into the list of objects and all parameters of the new object become available for input. 2. In the Object name line, select the 3D view of the object from the classifier. 3. In the Track name line, select the track file (TX3, NMEA) of the object's movement. 4. Set the Object start time and Object end time of the object movement relative to the beginning of the scenario or relative to another selected object of the scenario in hours:minutes:seconds. 5. In the absence of the data about end time of the movement to set the speed of object movement along a trajectory. 6. To execute customization of additional options and click on the Save button. If you need in deleting object of scenario it is necessary to choose the object in the list and consistently to press buttons Delete and Save.
Additional options of object: Show from the scenario start - object is displayed from the start of playing the scenario till the moment of the beginning its movement in the first point of appointed trajectory. Show till the end of scenario - object continues to be displayed from the moment of the movement end on the appointed trajectory till the end of scenario playing. Repeat object move - upon termination of object movement on the chosen trajectory of movement the object will cyclically repeat movement from an initial up to a final point of trajectory. Track object - at scenario performance a tracking the chosen object is carried out. This option can be selected only for one object of the scenario. Show track - at scenario performance the trajectory of object movement is displayed. In the line below, the inscription «Default 3D view» appears, corresponding to the programmatically defined red cross-shaped line. To change the view of the displayed trajectory, click the button to the right of the line and in the Select Object dialog that opens, select a linear object with a 3D view from the scenario classifier. Show vapor trail - at scenario performance the trace of object movement is displayed. In the line below, the inscription «Default 3D view» appears, corresponding to a programmatically defined cross-shaped line with a texture from the file «trail.bmp», which is part of the GIS. To change the view of the displayed trail, click the button to the right of the line and in the Select Object dialog that opens, select a linear object with a 3D view from the scenario classifier. Use height from track - at a choice of this option the object position is set in full conformity with the trajectory which has been written down in a file of a trajectory (rocket, plane). At disabling - the object movement is carried out strictly on the surface of model (a car, a train). When the Auto save option is enabled, all scenario changes are saved without pressing the Save button.
|