Editing of layers and classes |


|
|
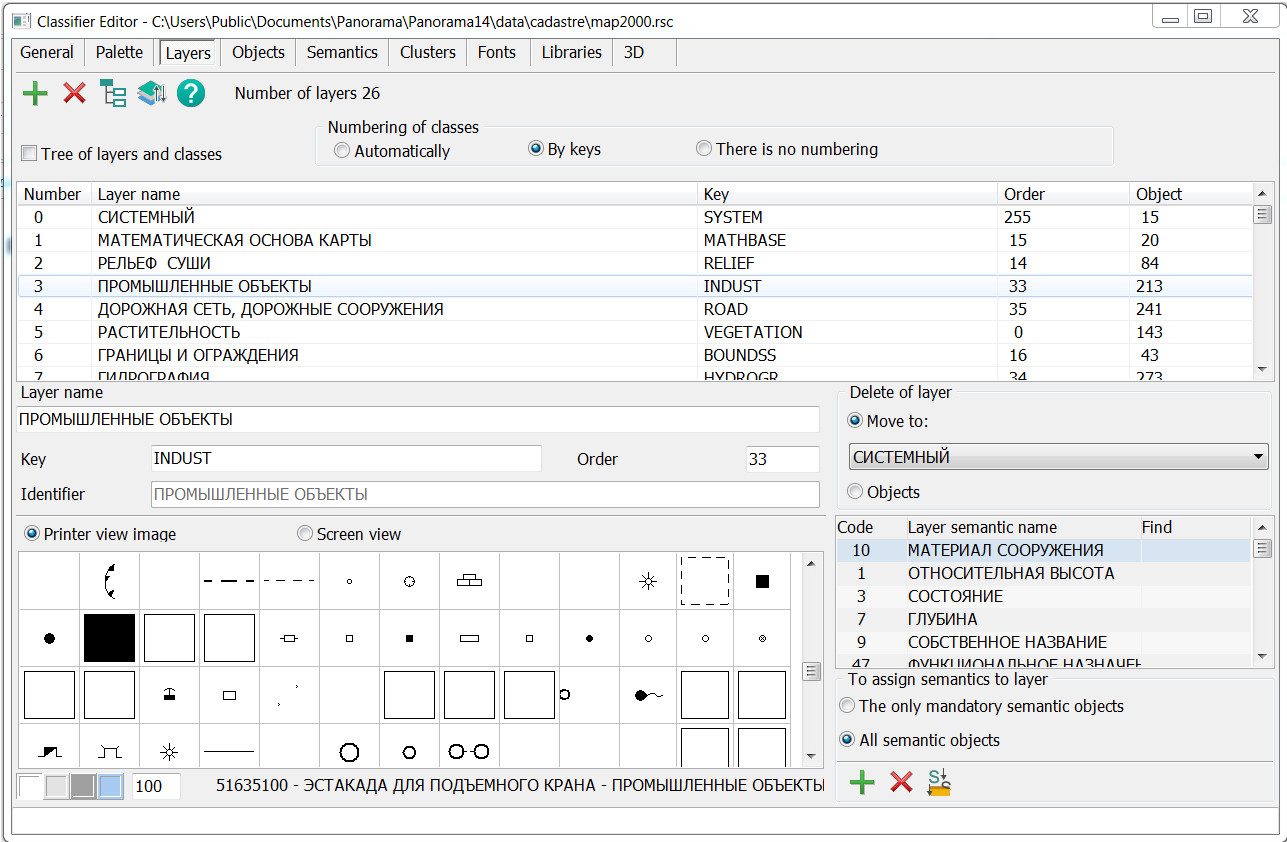
The Layers tab contains a list of layers and classes of the classifier in the form of a table of 5 columns: layer number, name, key, output order, number of objects. A layer is a collection of digital map objects related to the same topic. Classes are sublayers, that is, layers of a lower level.
In the initial version, only layers of objects are displayed in the table. To view the class hierarchy, you need to check the Tree of layers and classes box above the table and select the option of class numbering: Automatically, By keys or There is no numbering. Automatic numbering assumes a composite class number from the layer number and the numbers in order of the parent and selected classes.When you select numbering By keys, its key gets into the class number, so you can set a user numbering with the necessary numbers and letters. Layer characteristics are edited using the fields below the table. Adding and editing classes is done using the Classes Layer Number is generated automatically. This is the layer number in the order of creation. When you delete a layer, the numbers are reassigned. Layer name must be unique among layer names and semantic names. Key is a unique character key of no more than 15 characters. The key is used to communicate with databases (for field names) and this name should be formed taking into account the requirements of the database (preferably in Latin). Alias is a unique character string of no more than 31 characters. This is an obsolete field that was previously used as the name of the layer. It has lost its meaning, but can participate in the work of some tasks. It is customary to fill it with the abbreviated name of the layer, which must be unique in relation to other layers. Display order is a number from 0 to 255. When entering the display order, you should take into account the general order of displaying map objects: 1) polygon (below all); 2) line; 3) vector; 4) point; 5) title and mixed (above all).
This display order is valid for all map objects, regardless of the display order of layers and the order of objects in a layer. Classifier objects are divided into layers. Each layer has its own position. Below all, the «Vegetation» layer is usually displayed. Next come the layers: «Hydrography», «Hydraulic structures», «Road network», «Settlements». Above are: «Borders and fences», «Planning and high-rise basis», «Mathematical basis». The lowest objects correspond to the value of the order «0», the upper ones - «255». The Objects column shows the number of objects in this layer. To add a new layer, click the Add To edit the selected layer, correct the data in the input boxes. If incorrect data is entered, the field is highlighted in pink and an error message appears in the status line. Recording occurs when a new layer is selected or when switching to another bookmark. You can save all changes by clicking the Save You can sort layers by number, name or display order by clicking on the column header. In the lower part of the dialog, on the left, objects belonging to the layer or class selected in the table are displayed. By double-clicking on the image of an object, you go to the Objects tab with the selection of the specified object.
Deleting of layers A layer can be deleted with saving the objects of the layer being deleted and transferring them to another layer, or you can delete the layer with all the objects belonging to it. To delete a layer, highlight the required layer and use the Delete
Work with layer semantics At the bottom right, on the Layers tab, there is a table for working with general semantics for a layer (for communication with databases). When moving through the list of semantics, layer objects having this semantics are highlighted with a yellow frame. If the table of layer semantics is empty, you can fill it with a list of semantics of all objects in the layer or a list of required semantics of all objects in the layer. When you click the Fill To perform the tasks of the view mode of generalized information about the terrain object for the semantics of the layer, the attribute semantic - identifier has been added. Such semantics are highlighted * in the «Search» column. You can assign and remove the assignment of semantics-identifier of search for a layer by double clicking on the line of the layer's semantics. There cannot be more than 4 such semantics for a layer. If the layer contains heterogeneous objects or there are a lot of them, you can divide the layer objects into Layer classes. The dialog is called by clicking the Classes button. To see the classes in the general list of layers, click the Tree button. You can edit the name and key of an already created class in the input windows in the main dialog. Objects in a layer can also have their own display order - in accordance with the priority of significance. For example, objects with simple outlines («Dirt country roads», «Field and forest roads») appear below two-outline objects («Improved dirt roads»), which appear below two-outline orange objects («Highways», «Improved highways») and three-outline objects. («Motorways»). The lowest objects correspond to the order value «0», the top - «255». The order of displaying objects in a layer is configured by clicking the Order of displaying objects of a layer button. |